 otezilla, a dynamite notemaking application.
MEMOBOARDS
An organization system that is as simple as you want to keep it.
Memoboards are like having different cork boards, each one for a different topic or subject. But you can make this system of notes management very comprehensive or very succinct. I prefer the latter to the former.
The simple system: 3 boards
The simplest system is to have just three boards:
- ACT ON IT
Notes which require attention or action and so they are the very high priority. - PENDING
Notes which have received attention but have more action coming at the hands of someone else. - REFERENCE
Notes which have been completed but which you do not want delete permanently. You may want to refer to these again some time in the future but they do not fit into categories #1 or #2.
The detailed system: as many boards as you want
Some users may want to detail their memoboard organization to cover many bases, their many varied areas of interest. This system is not recommended because it becomes increasingly cumbersome and confusing over time.
Hence, a person could have memoboards for:
Home
Auto
Professionals
Reminders
Computers
Receipts
Purchases
Subscriptions
The list can grow and grow. We do not recommend this second system of memoboard management because it requires more interaction, better memory and more consideration when pinning a note to a board. The old KISS adage applies here, Keep It SuperSimple ! Therefore. the simple system is more effective, efficient and easier to manage.
Create a board
1. Open the Notezilla app ( Shift Alt Z HOTKEY method)
2. Click on the FILE dropdown menu and choose NEW MEMOBOARD
3. Type the BOARD NAME you want in the name box. (Boards are arranged alpha order automatically)
4. You may display the ‘Board Tree” using the VIEW dropdown menu and PINning it to the view pane by clicking the little ‘pin’ symbol. Unclick it to auto hide the board tree.
Create a note, TITLE it in its title bar and assign it to a particular board
1. Create a note ( CONTROL SHIFT W HOTKEY method)
2. TITLE the note in the TITLE BAR
Click somewhere inside the note. Move the cursor to the very top left of the note. Hover the mouse just a little above this location, the cursor will change to a cross arrows shape, Double click now to open the TITLE BAR which will appear WHITE in colour. Type the title you want (it centers itself automatically) and press the ENTER key when done.
3. You are back in the body of the note. Type whatever text you want.
4. Assigning the note to a specific memoboard. Click anywhere on the note to automatically display the ‘action bar’ for the note: 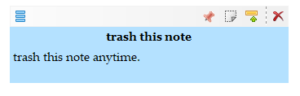
Click the three lines at the top left of the active note to access the note menu which permits one to do things with the note such as color selection, title editing, board assignment and much more. See the illustration below: